Hello all. Some of you may have seen my post on Twitter that i have removed the connectors from two 4 pin 60mm PWM case fans for a plan i had. Well now i shall tell you what said plan was. Lets start from the beginning. I replaced the two 4 pin 60mm PWM case fans in my IBM M52 with two 3 pin 60mm case fans however they wouldn't plug into the 4 pin headers on the motherboard so i had to use a couple of 3 pin fan connector to 4 pin molex connector adapters that came with the 3 pin 60mm fans.
Yesterday i had this idea where if i took the connectors off the 4 pin fans and put them on the 3 pin fans then i would be able to plug them into the motherboard headers. This would free up the adapters for other things (More on that soon.) and i would be able to read the RPM of the fans. So i set about finding out how to remove the connectors of a case fan.
I found a great guide on how to do this on YouTube here:
http://www.youtube.com/watch?v=iUUxt6GBV6A
I don't have one of those tools used in the video so i just used the end of a small metal file. I removed the connectors of the 4 pin fans first then i removed the connectors of the 3 pin fans and put the 4 pin connectors on the 3 pin fans. Plugged them into the motherboard headers and all is still working. Fairly easy to do really.
And thats the end of this post. Cya next time.
Thursday, November 1, 2012
Friday, October 5, 2012
Project Dell Dimension XPS H266 part 3.
Hello all. This is part 3 of my story of getting a Dell Dimension XPS H266 up and running again. I've actually taken the two 60mm fans out as i needed to put them in my main computer and i don't really think they where doing that much good seeing as the case has fairly small holes in the front. Unfortunately this older hardware doesn't have readable temperature sensors so i don't know what sort of temp it's running at. It doesn't seem to get that hot anyway.
Next thing i decided to do was put the original CD-ROM drive that came with it back in along side the CD/DVD drive i'd put in there before so it could have two optical drives. This tower PC has two 5.25-inch bays so this was fairly simple. now it have the two optical drives on the secondary IDE channel and the hard drive and zip drive on the primary IDE channel.
This PC also has three 3.5-inch bays that holds the floppy drive and the zip drive leaving one empty. Now i had a spare floppy drive from another PC that didn't work (A Dell Dimension 486/33) so i thought to my self perhaps i could add another floppy drive to the XPS H266. so i took the drive bay cage out and took the front cover of the empty 3.5-inch bay only to discover there was a metal plate behind it. It was connected at three points so i just bent it backwards and forwards and it came off. I then slid the floppy drive into the empty 3.5-inch bay, put the screws in and put the drive bay cage back into the PC.
At this point i realised the power supply only had one floppy drive power connector so a quick search on Google later and decided i needed a 4 pin molex to 4 pin floppy power connector. Managed to find a cheap one on eBay. got it a few days ago, hooked it up and now i have no spare molex connectors in this PC.
The floppy cable i'm using is from the same computer as the second floppy drive however i did run into a bit of a problem when it came to hooking the cable up to the two floppy drives. On the two floppy connectors on the cable there was a small bit of plastic on one side probably to stop you from putting the cable in the wrong way round. However with these particular floppy drives and this cable i needed to put the connector in the opposite way round. on the older drive it wasn't a problem but on the drive that came with this PC it was a bit trickier. You see it had a plastic shroud around the connector pins so the cable connector wouldn't go in. After a few minutes i decided to get rid of the little bit of plastic on the cable connector. Out came a metal file and a few minutes later i had the little plastic bit low enough to fit.
With all the cables hooked up i fired it up and made sure everything worked. All drives recognised in BIOS and in Windows 95. Haven't check Debian yet but all the drives should work with it.
And that's the end of this part. Cya next time.
Oh and i'll probably post some updated pictures at some point. May be a while though...
Thursday, July 26, 2012
Project Dell Dimension XPS H266 part 2.
Hello all. This is part 2 of my story of getting a Dell Dimension XPS H266 up and running again. With this computer i also got another old computer, A Dell Dimension 486/33 desktop PC which also didn't work when i got it and still doesn't. I think it has some sort of BIOS problem but that another story. I stripped it of most of the non-important hardware and that left me with a ISA sound card, an ISA scanner controller card, another CD-ROM drive and a IDE cable.
Now seeing as the XPS H266 only had a onboard sound card intergrated on the motherboard i thought seeing as it has three ISA slots why not see if it works in there. So i took the side panel off the XPS, stuck the ISA sound card in a free ISA slot, put the side panel back on and proceeded to install the software drivers. As this is a old sound card that only has DOS/Win 3.1 drivers i had to install it through DOS on Win95 and once i got it all installed it worked.
Next thing i did was replace the CD-ROM drive with a CD/DVD-ROM drive that was actually in my current computer seeing as it is a ATA drive. That went well too. I decided that it would be interesting to try and install Linux on this PC as Linux runs very well on old hardware and it would be a up to date operating system so if i could figure out how to connect it to the internet i could. It took me a while to decide which distro to install but i decided on Debian in the end as it has really good hardware detection and fairly good minimum requirements too. Getting it install however wasn't easy. Because this computer didn't have any form of Ethernet (only dial-up) it was going to be interesting. After trying to install from both the first installation disc and the netinst disc which didn't work i ended up booting from PLOP boot manager on a floppy and then booting to the first installation disc on a USB stick which was installed to the USB stick using UNetbootin.
After getting Debian installed i set about trying to connect to the internet and the only way i could think of was by using a spare USB wireless dongle i have. After a while i got that working and i could connect to my wireless router and update it. I've also made it so i can SSH into it as i only have one monitor and having to switch the VGA cable around is a bit of a pain.
And thats caught you all up to where i am now. If you want to know if i do anything else with this computer then follow me on twitter as i post on there when i do these things(If i remember that is). Now on to the specs of this beast:
Dell Dimension XPS H266
CPU: Intel Pentium II with MMX running at 266MHz with a 32KB internal cache
Motherboard: Intel 440FX PCIset
Memory: 4 SIMM sockets, 2 used, 2 available. 2 32MB EDO RAM modules installed.
Expansion slots: 7, 3 PCI slots, 4 ISA slots.
Graphics card: Matrox Millennium MGA-MIL/4 PCI 4MB
sound cards: Yamaha OPL3-SA2 and SC400 Rev. 4G Sound FX Gold-16
TV card: Win/TV-PCI PAL-BG/I 60134 rev C2V
Modem: Sportster Voice 28.8 Faxmodem
Hard drive: Western Digital 8.4GB ATA
Optical drive: TSST TS492C CD-RW/DVD-ROM drive
Zip drive: Iomega zip 100 internal ATA drive
Floppy drive: NEC floppy disk drive
Fans: 1 rear 9.2cm, 2 front 6cm.
PSU: 200W
OSs: Windows 95 OSR 2.1 and Debian squeeze 6.0
And finally a few pictures of this computer:


Friday, July 20, 2012
Project Dell Dimension XPS H266 has started!
Hello all. A few weeks ago i got a old Dell Dimension XPS H266 tower PC that had the RAM go bad in it and it had no hard drive and i thought to myself this would make a great PC for old PC games that only run on DOS/Win95 so i set about first finding some RAM for it which was easier said than done and then set about finding a hard drive, not that easy either.
As this is a fairly old computer it uses 72 pin SIMM EDO modules either 16MB or 32MB in size and can take up to a maximum of 128MB of RAM. Doesn't sound like much does it? It's surprising how quick it actually is. More on that later though. So i searched the internet for days trying to find the right type of RAM and finally i found some. As usual eBay came to the rescue. I found a couple of sticks each 32MB in size. That would give me 64MB of RAM to play with. not bad.
So i got them, took the old out and put in the new and they worked! One down one to go. Next up was the hard drive and it was a bit easier to find the right one. Again as this PC is fairly old it uses the ATA IDE interface for hard drives and optical drives. eBay came good again and i found a 8.4GB Western Digital hard drive that looked like it should work so i got that, whacked it in, turned the computer on and it was being recognised by the BIOS. Two out of two and everything was going well.
With this computer i also got Windows 95 OSR 2.1 (I think) so as Win95 can run both DOS and Windows programs i set about installing win95 on this computer. Installing Win95 was a fairly painless process and soon i was booted into Win95. I then started to update it. First i installed the latest version of DirectX that is compatible with Win95 which is DirectX 8, Then i installed the latest version of Internet Explorer that is compatible with Win95 which is IE6, I got the two USB ports working and installed the drivers for all the hardware. So i now have relatively up to date installation of Win95.
And thats the end of this blog post, Next time the story continues as i install more hardware and see what this thing is really capable of. I'll also post detailed information about the hardware and a few pictures of it.
Se you next time.
Saturday, June 16, 2012
My current PC, A IBM M52 part 2
Hello again. today i'm going to talk about the insides of this computer. First a picture of it with just the top cover open:
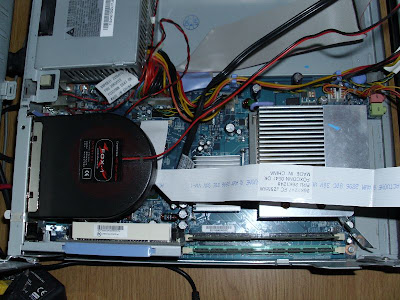
to get access to the CPU, RAM, hard drive, floppy drive and front fans you need to tilt the whole front section up like this:
In the drive bay we have the CD/DVD drive on top of the hard drive and next to them is the floppy drive.
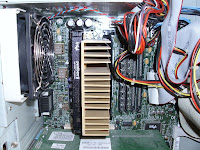
The PSU is in the top left corner in the above picture with the motherboard being across the bottom. Starting from the left we have the PCI riser card with one PCI port and one ADD 2-R port that can also work as a PCI-E 1x port.
As you can see i have a PCI slot fan in the top PCI slot which is held up by a piece of metal from a video tape. This case doesn't come with any screws to hold PCI cards/fans in place so hence i used that.
Then we have the two RAM slots to the right of the PCI riser card slot. It can take a maximum of 2GB of RAM in each slot making a total of 4GB. I currently have 3GB of RAM in it which makes it a fairly quick machine.
Above the RAM we have two heatsinks, one smaller one on the left and a bigger one on the right. The smaler one on the left is over the north bridge chipset and the bigger one is for the Pentium 4 CPU. We then have the two case/CPU fans on the drive bay to the right of the CPU heatsink. These are right in front of the front grill. A bit of info about these fans:
Make: SUPERRED
Model: CHD6012ES-AH(E)
Power info: DC12V 0.30A
Connector type: 4 pin
Dimensions: 6cm - width, 2cm - depth
A close up of the two fans:
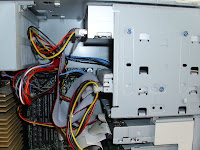
I plan on replacing these two front fans with more efficient/quieter ones soon. See if i can get it to run a bit cooler and quieter. I'll finally leave you with another couple of pictures of inside it:
If you have any questions or comments about anything on my blog feel free to email me.
 |
| It with the cover open, in this picture you can see the PSU, DVD drive, PCI fan and a bit of the motherboard. |
 |
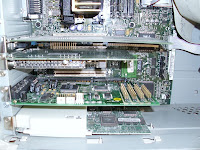
| The front drive bay tilted all the way up. |
The PSU is in the top left corner in the above picture with the motherboard being across the bottom. Starting from the left we have the PCI riser card with one PCI port and one ADD 2-R port that can also work as a PCI-E 1x port.
As you can see i have a PCI slot fan in the top PCI slot which is held up by a piece of metal from a video tape. This case doesn't come with any screws to hold PCI cards/fans in place so hence i used that.
Then we have the two RAM slots to the right of the PCI riser card slot. It can take a maximum of 2GB of RAM in each slot making a total of 4GB. I currently have 3GB of RAM in it which makes it a fairly quick machine.
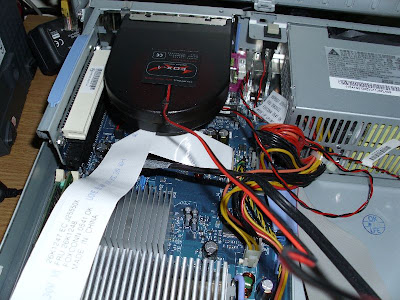
Above the RAM we have two heatsinks, one smaller one on the left and a bigger one on the right. The smaler one on the left is over the north bridge chipset and the bigger one is for the Pentium 4 CPU. We then have the two case/CPU fans on the drive bay to the right of the CPU heatsink. These are right in front of the front grill. A bit of info about these fans:
Make: SUPERRED
Model: CHD6012ES-AH(E)
Power info: DC12V 0.30A
Connector type: 4 pin
Dimensions: 6cm - width, 2cm - depth
A close up of the two fans:
 |
| The two case/CPU fans. |


If you have any questions or comments about anything on my blog feel free to email me.
Saturday, June 9, 2012
My current PC, A IBM M52 part 1
Hello all. Today i'm going to talk about my current PC which is a IBM M52 8215-CTO. There will be several parts to this as i keep upgrading it and i will write about my experiences with it. First a overall picture of my PC:
As you can see i have a HP 1740 17" LCD monitor connected to my M52. I have a Logitech K120 keyboard which is pretty good seeing as it's a fairly cheapish one and a GAME brand mouse, again fairly basic but does the job. You can also just about see on the left a BT Voyager 1500 wireless router that i mainly use for experiments.
Next i'll show you a close up of the front:
Next a picture of the back:
There is also two PCI slots at the top right. As you can see the bottom one is not in use and the top one has a PCI slot fan mounted in it. Some of you may have noticed that there is small piece of metal on the right side of the PCI fan grate. I'm using that to keep the PCI fan in place. Without it the front would fall down as it doesn't fit overly well. More on the insides later though.
Finally i shall leave you with the specs of this PC as it is:
IBM M52 8215-CTO
CPU: Intel(R) Pentium(R) 4 CPU 3.00GHz HT SL7Z9
Motherboard: Custom BTX motherboard with the Intel 945G chipset
RAM: 1x Crucial 2GB DDR2-SDRAM PC2-5300 and 1x Kingston 1GB DDR2-SDRAM PC2-5300
Hard Drive: Hitachi Deskstar 7K80 series 80GB (HDS728080PLA380 40Y9028LEN)
Optical Drive: TSSTcorp CDW/DVD TS-H492C
Graphics Card: Intel(R) 82945G Express Chipset Family 212MB
Sound Card: SoundMAX Integrated Digital HD Audio
PSU: Delta Electronics DPS-225HB A 225W
Monitor: HP L1740 LCD Monitor
OS: Microsoft Windows XP Pro (2600) SP3
 |
| My Desktop and monitor on my computer desk. Yeah it's a mess. |
Next i'll show you a close up of the front:
 |
| At the bottom left is the grill for the two CPU fans, Top left is the floppy drive, At the top right is the CD-RW/DVD Drive, At the bottom we have the headphone and microphone jacks, To the left of those is the two front USB 2.0 ports, the power button and the power and HDD indicator lights. |
 |
| On the back starting from the left is the PSU fan grill, power socket, under that is the voltage switch, Then we have the old keyboard and mouse ports, next to them is four USB 2.0 ports, A parallel port, Line in and line out audio ports, A VGA video port, two more USB 2.0 ports , a ethernet port and two serial ports. |
Finally i shall leave you with the specs of this PC as it is:
IBM M52 8215-CTO
CPU: Intel(R) Pentium(R) 4 CPU 3.00GHz HT SL7Z9
Motherboard: Custom BTX motherboard with the Intel 945G chipset
RAM: 1x Crucial 2GB DDR2-SDRAM PC2-5300 and 1x Kingston 1GB DDR2-SDRAM PC2-5300
Hard Drive: Hitachi Deskstar 7K80 series 80GB (HDS728080PLA380 40Y9028LEN)
Optical Drive: TSSTcorp CDW/DVD TS-H492C
Graphics Card: Intel(R) 82945G Express Chipset Family 212MB
Sound Card: SoundMAX Integrated Digital HD Audio
PSU: Delta Electronics DPS-225HB A 225W
Monitor: HP L1740 LCD Monitor
OS: Microsoft Windows XP Pro (2600) SP3
Wednesday, May 2, 2012
Quick Tech Tip #2: Clean your fans.
Hello all. Today i'm going to talk about cleaning your fans. No matter what type of computer you have keeping it cool will help prolong the life of your computer and make it a bit quieter too. One way of doing this is to clean out your fans and heatsink.
All computers will be different but they all should have at least one fan (Mainly laptops) and one heatsink (some, mostly desktops have 2 or 3 fans, maybe more). both of these can get quite dusty and when they get dusty it makes them less efficient which in turn makes your computer hotter.
I had one laptop where the fan grate on the heatsink half blocked up with dust raised the temperature about 20C so maintaining clean fans and a clean heatsink will reduce the temperature and prolong the life of your computer. The way i do this is to just take a cotton bud/swab and wipe the fan blades as well as the grates on the heatsink. make sure you can see straight through the heatsink grates and that there is nothing blocking any of them. Also make sure that the air intakes on you computer are clean as well.
And thats it for this quick tech tip. I hope this post has helped you and i'll see you next time. Till then.
Friday, April 13, 2012
Quick Tech Tip #1: Defragmenting your hard drive.
Hello all. Today i'm going to talk about defragmenting your hard drive. If your using Windows it's a smart plan to defragment your hard drive. Basically a fragmented hard drive is where a file is in multiple places on the hard drive. This can happen to many files. defragmenting your hard drive is a process that puts all of one file together on the hard drive thus making it easier and quicker for Windows to find said file.
There are many programs out there that can defrag your hard drive. There is also a built in defragger in Windows. to use the one build into Windows just do this:
1: Right click on My Computer.
2: Click on Manage.
3: Then in the left hand side pane of the window that just popped up click on Disk Defragmenter.
4: Then either click on the Analyze button to analyze your hard drive to see if it needs defragmenting or click on the Defragment button to defragment your hard drive.
I use Auslogics Disk defrag at the moment and it seem very good however there are other ones out there too.
you should defragment your hard drive every month at least. I'd recommend every two weeks just to make sure it doesn't get that bad. Some programs offer a quick defrag option that takes a lot less time that you can do every week or two.
Remember: never pay for this sort of software as most of the time it really isn't any better than the free ones.
And thats the end of this Quick Tech Tip. I hope this post helped you and i'll see you next time. Till then.
Thursday, April 12, 2012
Introducing Quick Tech Tips.
Hello all. Today i'm posting about a new series of posts called Quick Tech Tips. Every so often i will post a short "tech tip" that i've learnt through my years of trying to fix computers. These will be anything related to computers really.
also a quick bit of news i've just released V0.1.5 of my Simple Text Editor. (STE) You can download it from the SourceForge page here:
http://sourceforge.net/projects/simpletxteditor/
also a quick bit of news i've just released V0.1.5 of my Simple Text Editor. (STE) You can download it from the SourceForge page here:
http://sourceforge.net/projects/simpletxteditor/
Subscribe to:
Posts (Atom)